

|
1. When I start Fiberworks a message appears saying "Can't Open File" or "Can't Find File". | 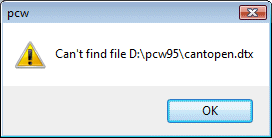 |
What's gone wrong? |
Your copy of Fiberworks is set to re-open the last design file that you used in your previous session. For some reason, the designated file is not available, so can't be opened. |
How do I fix it? | Go to the File menu and select New Drawdown to open a blank drawdown, or select Open Drawdown to open a different file. The normal drawdown window will then appear. |
Why did this happen? | There are several reasons why a file might not be available:
|
How do I stop this happening in the future? | First thing - don't get too upset about this message - nothing is broken, just go to the file menu and select New for a blank drawdown, or Open to open a different file. If you get files from the internet, it might be best to download the file, which makes a permanent copy on your computer, rather than opening directly, which only creates a temporary file. Another way to prevent this happening is to turn off the feature that reopens the last file used. Go to File Preferences (version 4.2) or View Preferences (versions 4.0 and 4.1), select Misc. Settings, and uncheck the box that says Reopen most recent file at startup. Fiberworks will then always start with a blank drawdown instead of trying to look for a file that might not be available.  . . |
2. I'm installing Fiberworks and I get
|
The security measures for installing programs in Windows 7 require you to run as administrator when you install software. This is intended to block programs that install themselves without your knowledge. It is not sufficient to be logged on as administrator; to run as administrator:
|
3. Why do I only see dtx files when I try to open files in Fiberworks? Where are my wif files? |
The default file type for Fiberworks is dtx, so when you first go to open files that's what is shown in the File Open dialog. To change the file type, click in the box labelled Files of type (step 1). |
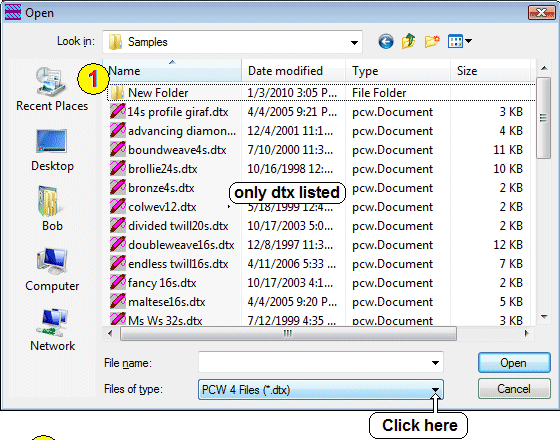 | |
|
A list of file types will drop down. Wif is third in this list. Click on Wif to select (step 2). | |
 | |
|
The File open dialog will now show the wif files in the current folder (step 3). | |
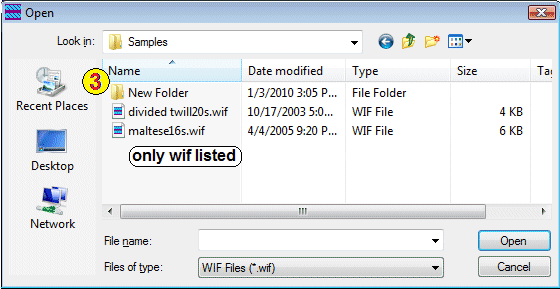 | |
|
If there are no wif files listed, they may have been saved in a different folder on your computer. |
|
| 4. Help Files: HELP! I have Fiberworks version 4.1 or 4.0 and my Help files do not work on Windows Vista®. What can I do? | Windows Vista and 7 no longer automatically include the WinHlp32 program which is required to display the help files provided with older versions of Fiberworks PCW. Instead, Vista and 7 use a new system called HTMLHelp. Window XP uses both types of Help file. Fiberworks Version 4.2 with the new HTML Help file is now available at Bronze, Silver and Silver Plus levels. There is a small charge for this upgrade (free if you purchased version 4.1 after July 2009). If you wish to continue to use your existing Fiberworks version with old WinHelp help files, you
can download a copy of WinHlp32 (intended for Windows
Vista) from the Microsoft website. Go to: Microsoft does not permit us to distribute the Winhelp program with our Fiberworks PCW package. "Help" refers to pages that are displayed when you go to the Help item in the main PCW menu and select Help Topics, or if you press the F1 key within the Fiberworks PCW program, or click a "Help" button in a dialog within Fiberworks PCW. The Fiberworks manual is not affected
and is fully functional. The manual is a separate item which appears
as a separate icon or entry in the Fiberworks folder. |
| 5. How do I change thread thickness? 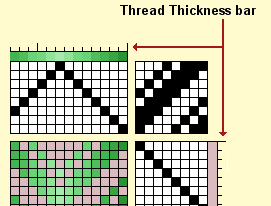 |
a. With the mouse. Click in the thread thickness bar, which resembles an comb above the warp color bar or to the right of the weft color bar. Left click doubles width, right click halves it. b. With the keyboard. Click in the first thread to be changed and type a thickness from 1 to 64. Default thickness is 4, which results in a square cell in the threading or treadling draft. Move cursor to next thread and type in a number. c. With the menu. The warp or weft thickness menu allow you to fill the draft with 5 different common thick and thin thread orders. |
| 6. Can I print numbers in my threading, treadling or tieup? | Yes! |
| 7. Can I print some parts of the design rather than the whole thing? | Yes. It’s easy. a. To print only a threading, treadling, tieup or cloth: b. To print a specific portion of the whole design: c. To print specific pages only: Note: If you have a design that requires 5 pages across and 3 pages down, 15 pages are needed not 8. |
| 8. How do I print sideways or in landscape mode? | Before beginning printing, go to File / Print Setup. Select the landscape or portrait orientation, paper size, printer and printer properties. Note: Set the paper size and orientation before going to Preview
and Print. Otherwise you will get some odd results! |
| 9. Can I modify a color in my design? | Yes. |
| 10. Can I save a palette that I created? | If you have modified the colors in the palette, save the design you are working on, then clear all data except the colors in the draft and save it as a new file. Use an obvious name such as palet01.dtx to make it easy to find in the future. Note: If the colors in the warp or weft color bars are the default values, the new palette will not be saved. You must use the new colours in the warp or weft to be saved. To copy a palette from one design to another, go to the Edit menu and click Select All. Uncheck all the boxes except Color Palette, and click Copy. 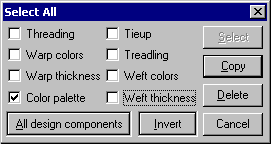 Open the design where you want the palette, and click Paste. |
| 11. Can I save just a threading or a treadling? Can I get just a tieup from a saved design? | To save just a component of a design, such as the threading or the tieup, go to the Edit / Select All and copy the components you want to use. Open a new design and paste into the blank design in the normal way. To extract a component from a saved design, open it in the normal way. Copy the component by Edit / Select All. Check only the parts you want to copy and then paste into the design you are working on. Only the selected components will appear in the new design. |
| 12. Can I use colors from two separate palettes? How can I keep both sets in one design? | It’s a little devious, but it can
be done. If only one or two new colors from one designs are needed. Open the Modify Color dialogue and look at the color codes for each of those colors. Go to the new design and adjust unused colors in the existing palette with the Modify Colors dialogue. |
| 13. I cannot set up a second e-dobby
loom in Silver Plus. |
Some of the internal settings for the looms
have not been reset. This may cause a conflict, and may also force
PCW4.x to close. |
| 14. Can I paste a draft into my word processing program? | Use Edit/Copy image: |
| 15. My design printed out on one page and then a second page appeared with a skinny strip down the left edge. How can I stop this? | Either decrease the left and/or right margins,
increase the epi, or select Fit to Page in the Print Setup
dialogue. |
| 16. Can I use more than two colors in a draft? | The warp and weft menus provide simple repetitive
2 color schemes. To enter more complicated orders you may proceed
in a couple of different ways. |
| [Home] [What's New] [Product] [Download] [Purchase] [FAQs] [Gallery] [Teaching] [Contact Us] [Site Index] |
| If you have any questions or comments about this
site go to Contact Us |